Setup instructions
If you are like the typical Prologin organizer, you’re probably reading this documentation one day before the start of the event, worried about your ability to make everything work before the contest starts. Fear not! This section of the documentation explains everything you need to do to set up the infrastructure for the finals, assuming all the machines are already physically present. Just follow the guide!
Maintainers:
Alexandre Macabies (2013-2019)
Antoine Pietri (2013-2018)
Rémi Audebert (2014-2019)
Paul Hervot (2014, 2015)
Marin Hannache (2013, 2014)
Pierre Bourdon (2013, 2014)
Nicolas Hureau (2013)
Pierre-Marie de Rodat (2013)
Sylvain Laurent (2013)
Step 0: hardware and network setup
Before installing servers, we need to make sure all the machines are connected to the network properly. Here are the major points you need to be careful about:
Make sure to balance the number of machines connected per switch: the least machines connected to a switch, the better performance you’ll get.
Inter-switch connections is not very important: we tried to make most things local to a switch (RFS + HFS should each be local, the rest is mainly HTTP connections to services).
Have a very limited trust on the hardware that is given to you, and if possible reset them to a factory default.
For each pair of switches, you will need one RHFS server (connected to the 2 switches via 2 separate NICs, and hosting the RFS + HFS for the machines on these 2 switches). Please be careful out the disk space: assume that each RHFS has about 100GB usable for HFS storage. That means at most 50 contestants (2GB quota) or 20 organizers (5GB quota) per RHFS. With contestants that should not be a problem, but try to balance organizers machines as much as possible.
You also need one gateway/router machine, which will have 3 different IP addresses for the 3 logical subnets used during the finals:
- Users and services
192.168.0.0/23
- Alien (unknown)
192.168.250.0/24
- Upstream
Based on the IP used by the bocal internet gateway.
Contestants and organizers must be on the same subnet in order for UDP broadcasting to work between them. This is required for most video games played during the finals: server browsers work by sending UDP broadcast announcements.
Having services and users on the same logical network avoids all the traffic from users to services going through the gateway. Since this includes all RHFS traffic, we need to make sure this is local to the switch and not being routed via the gateway. However, for clarity reasons, we allocate IP addresses in the users and services subnet like this:
- Users
192.168.0.0 - 192.168.0.253
- Services and organizers machines
192.168.1.0 - 192.168.1.253
Step 1: setting up the core services: MDB, DNS, DHCP
This is the first and trickiest part of the setup. As this is the core of the architecture, everything kind of depends on each other:
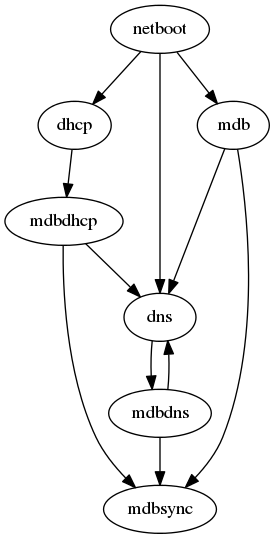
Fortunately, we can easily work around these dependencies in the beginning.
All these core services will be running on gw, the network gateway.
They could run elsewhere but we don’t have a lot of free machines and the core
is easier to set up at one single place.
The very first step is to install an Arch Linux system for gw. We have
scripts to make this task fast and easy.
Basic system: file system setup
Note
The installation process is partially automated with scripts. You are strongly advised to read them and make sure you understand what they are doing.
Let’s start with the hardware setup. You can skip this section if you are doing a containerized install or if you already have a file system ready.
For gw and other critical systems such as web, we setup a RAID1
(mirroring) over
two discs. Because the RAID will be the size of the smallest disc, they have to
be of the same capacity. We use regular 500GBytes SATA, which is usually more
than enough. It is a good idea to choose two different disks (brand, age,
batch) to reduce the chance to have them failing at the same time.
On top of the RAID1, our standard setup uses LVM to create and manage the system
partition. For bootloading the system we use the good old BIOS and syslinux.
All this setup is automated by our bootstrap scripts, but to run them you will need a bootstrap Linux distribution. The easiest solution is to boot on the Arch Linux’s install medium https://wiki.archlinux.org/index.php/Installation_guide#Boot_the_live_environment.
Once the bootstrap system is started, you can start the install using:
bash <(curl https://raw.githubusercontent.com/prologin/sadm/master/install_scripts/bootstrap_from_install_medium.sh)
This script checks out sadm, then does the RAID1 setup, installs Arch Linux and configures it for RAID1 boot. So far nothing is specific to sadm and you could almost use this script to install yourself an Arch Linux.
When the script finishes the system is configured and bootable, you can restart the machine:
reboot
The machine should reboot and display the login tty. To test this step:
The system must boot
Systemd should start without any
[FAILED]item.Log into the machine as
rootwith the password you configured.Check that the hostname is
gw.proloby invokinghostnamectl:Static hostname: gw.prolo Icon name: computer-container Chassis: container Machine ID: 603218907b0f49a696e6363323cb1833 Boot ID: 65c57ca80edc464bb83295ccc4014ef6 Virtualization: systemd-nspawn Operating System: Arch Linux Kernel: Linux 4.6.2-1-ARCH Architecture: x86-64
Check that the timezone is
Europe/Parisand NTP is enabled usingtimedatectl:Local time: Fri 2016-06-24 08:53:03 CEST Universal time: Fri 2016-06-24 06:53:03 UTC RTC time: n/a Time zone: Europe/Paris (CEST, +0200) Network time on: yes NTP synchronized: yes RTC in local TZ: no
Check the NTP server used:
systemctl status systemd-timesyncd
Sep 25 13:49:28 halfr-thinkpad-e545 systemd-timesyncd[13554]: Synchronized to time server 212.47.239.163:123 (0.arch.pool.ntp.org).
Check that the locale is
en_US.UTF8with theUTF8charset usinglocalectl:System Locale: LANG=en_US.UTF-8 VC Keymap: n/a X11 Layout: n/a
You should get an IP from DHCP if you are on a network that has such a setup, else you can add a static IP using a
systemd-network.networkconfiguration file.
Basic system: SADM
We will now start to install and configure everything that is Prologin-specific.
The bootstrap script has already copied the sadm repository to /root/sadm.
We will now use a script that installs the dependencies that have to be present
on all system using sadm. We are running the script on gw.prolo and it will
executed on every systems: rhfs, web, rfs.
cd /root/sadm/install_scripts
./setup_sadm.sh
This script also creates a python virtual environment. Each time you log into a new system, activate the virtualenv:
source /opt/prologin/venv/bin/activate
Basic system: gw
Once the system is SADM-ready, perform installs specific to gw.prolo:
./setup_gw.sh
Gateway network configuration
gw has multiple static IPs used in our local network:
192.168.1.254/23 used to communicate with both the services and the users
192.168.250.254/24 used to communicate with aliens (aka. machines not in mdb)
It also has IP to communicate with the outside world:
10.?.?.?/8 static IP given by the bocal to communicate with the bocal gateway
163.5.??.??/16 WAN IP given by the CRI
The network interface(s) are configured using systemd-networkd. Our
configuration files are stored in etc/systemd/network/ and will be installed
in /etc/systemd/network during the next step.
Two files must be modified to match the hardware of the machine:
etc/systemd/network/10-gw.link: edit theMACAddressfield of the file to set the MAC address of your NIC.etc/systemd/network/10-gw.network: we enable DHCP configuration and set the local network static IPs. You can edit this file to add more static IPs or set the gateway you want to use.
For this step, we use the following systemd services:
From systemd:
systemd-networkd.service: does the network configuration, interface renaming, IP setting, DHCP getting, gateway configuring, you get the idea. This service is enabled by the Arch Linux bootstrap script.From sadm:
nic-configuration@.service: network interface configuration, this service should be enabled for each of the interface on the system.From sadm:
conntack.service: does the necessary logging to comply with the fact that we are responsible for what the users are doing when using our gateway to the internet.
For more information, see the systemd-networkd documentation.
Then, install them:
python install.py systemd_networkd_gw nic_configuration conntrack
# you can now edit the configuration files as previously described
systemctl enable --now systemd-networkd conntrack
# `prologin` is the name of the interface to apply the configuration
systemctl enable --now nic-configuration@prologin
At this point you should reboot and test your network configuration:
Your network interfaces should be up (
ip link showshoud showstate UPfor all interfaces butlo).The IP addresses (
ip address show) are correctly set to their respective interfaces.Default route (
ip route show) should be the CRI’s gateway.DNS is not working until you setup ``mdbdns``, so keep on!
Setup PostgreSQL on gw
First we need a database to store all kind of data we have to manipulate. There
are two main PostgreSQL databases systems running the final, the first is on
gw and the second is on web. The one on gw is used for sadm critical
data such as the list of machines and users, while the one on web is used
for contest related data.
By running this command, you will install the configuration files and start the database system:
cd sadm
python install.py postgresql
systemctl enable --now postgresql
To test this step:
$ systemctl status postgresql.service
● postgresql.service - PostgreSQL database server
   Loaded: loaded (/usr/lib/systemd/system/postgresql.service; enabled; vendor preset: disabled)
   Active: active (running) since Sun 2016-09-25 15:36:43 CEST; 2h 29min ago
 Main PID: 34 (postgres)
   CGroup: /machine.slice/machine-gw.scope/system.slice/postgresql.service
           ├─34 /usr/bin/postgres -D /var/lib/postgres/data
           ├─36 postgres: checkpointer process
           ├─37 postgres: writer process
           ├─38 postgres: wal writer process
           ├─39 postgres: autovacuum launcher process
           └─40 postgres: stats collector process
$ ss -nltp | grep postgres
LISTEN     0      128          *:5432                     *:*                   users:(("postgres",pid=34,fd=3))
LISTEN     0      128         :::5432                    :::*                   users:(("postgres",pid=34,fd=4))
$ su - postgres -c 'psql -c \\l'
                                    List of databases
   Name    |  Owner   | Encoding |   Collate   |    Ctype    |   Access privileges
-----------+----------+----------+-------------+-------------+-----------------------
 postgres  | postgres | UTF8     | en_US.UTF-8 | en_US.UTF-8 |
 template0 | postgres | UTF8     | en_US.UTF-8 | en_US.UTF-8 | =c/postgres          +
           |          |          |             |             | postgres=CTc/postgres
 template1 | postgres | UTF8     | en_US.UTF-8 | en_US.UTF-8 | =c/postgres          +
           |          |          |             |             | postgres=CTc/postgres
(3 rows)
mdb
We now have a basic environment to start setting up services on our gateway
server. We’re going to start by installing mdb and configuring nginx as
a reverse proxy for this application.
First, we need to install nginx:
$ pacman -S nginx
In order to test if mdb is working properly, we need to go to query
http://mdb/ with a command line tool like curl. However, to get DNS
working, we need mdbdns, which needs mdbsync, which needs mdb. As a
temporary workaround, we’re going to add mdb to our /etc/hosts file:
echo '127.0.0.1 mdb' >> /etc/hosts
Similarly, our nginx configuration depends on the sso host to resolve,
without what nginx will refuse to start. We have to define it statically too:
echo '127.0.0.1 sso' >> /etc/hosts
Then install mdb. Fortunately, a very simple script is provided with the
application in order to setup what it requires:
# You can then proceed to install
python install.py mdb
mv /etc/nginx/nginx.conf{.new,}
# ^ To replace the default configuration by our own.
Note
You don’t have to create super users for mdb or udb using the
manage.py command. The root users you will add to udb will
be super user and replicated to mdb. If you want to modify the databases
before that, use manage.py shell.
This command installed the mdb application to /var/prologin/mdb and
installed the systemd and nginx configuration files required to run the
application.
You should be able to start mdb and nginx like this:
systemctl enable --now mdb
systemctl enable --now nginx
Now you should get an empty list when querying /call/query:
curl http://mdb/call/query
# Should return []
Congratulations, mdb is installed and working properly!
You can check the journal for nginx, and should see:
journalctl -fu nginx
...
Mar 22 20:12:12 gw systemd[1]: Started Openresty, a powerful web app server, extending nginx with lua scripting.
Mar 22 20:14:13 gw nginx[46]: 2017/03/22 20:14:13 [error] 137#0: *1 connect() failed (111: Connection refused), client: 127.0.0.1, server: mdb, request: "GET /query HTTP/1.1", host: "mdb"
Mar 22 20:14:13 gw nginx[46]: 2017/03/22 20:14:13 [error] 137#0: *1 [lua] access.lua:77: SSO: could not query presenced: failed to join remote: connection refused, client: 127.0.0.1, server: mdb, request: "GET /query HTTP/1.1", host: "mdb"
Note
nginx will log an error (connect() failed (111: Connection refused),
client: 127.0.0.1, server: mdb) when attempting to connect to the upstream,
this is normal and should only happen for the first time you connect to a
service.
mdbsync
The next step now is to setup mdbsync. mdbsync is a Tornado web server
used for applications that need to react on mdb updates. The DHCP and DNS
config generation scripts use it to automatically update the configuration when
mdb changes. Once again, setting up mdbsync is pretty easy:
python install.py mdbsync
systemctl enable --now mdbsync
systemctl reload nginx
echo '127.0.0.1 mdbsync' >> /etc/hosts
To check if mdbsync is working, try to register for updates:
python -c 'import prologin.mdbsync.client; prologin.mdbsync.client.connect().poll_updates(print)'
# Should print {} {} and wait for updates
mdbdns
mdbdns gets updates from mdbsync and regenerates the DNS configuration.
Once again, an installation script is provided:
python install.py mdbdns
mv /etc/named.conf{.new,}
# ^ To replace the default configuration by our own.
systemctl enable --now mdbdns
systemctl enable --now named
We now need to add a record in mdb for our current machine, gw,
so that DNS configuration can be generated:
cd /var/prologin/mdb
python manage.py addmachine --hostname gw --mac 11:22:33:44:55:66 \
    --ip 192.168.1.254 --rfs 0 --hfs 0 --mtype service --room pasteur \
    --aliases mdb,mdbsync,ns,netboot,udb,udbsync,presencesync,ntp,sso
Once this is done, mdbdns should have automagically regenerated the DNS
configuration:
host mdb.prolo 127.0.0.1
# Should return 192.168.1.254
You can now remove the lines related to mdb, mdbsync and sso from
your /etc/hosts file.
mdbdhcp
mdbdhcp works just like mdbdns, but for DHCP. You must edit
dhcpd.conf to add an empty subnet for the IP given by the Bocal. If it is
on the same interface as 192.168.0.0/23, add it inside the shared-network
prolo-lan, else add it to a new shared-network:
python install.py mdbdhcp
mv /etc/dhcpd.conf{.new,}
# ^ To replace the default configuration by our own.
$EDITOR /etc/dhcpd.conf
systemctl enable --now mdbdhcp
The DHCP server will provide the Arch Linux install medium for all the servers, for that, download the Netboot Live System:
# See https://www.archlinux.org/releng/netboot/
wget https://www.archlinux.org/static/netboot/ipxe.pxe -O /srv/tftp/arch.kpxe
Start the DHCP server:
systemctl enable --now dhcpd4
Note
gw needs to have 192.168.1.254/23 as a static IP or else
dhcpd will not start.
To test this step:
$ systemctl status dhcpd4
● dhcpd4.service - IPv4 DHCP server
   Loaded: loaded (/usr/lib/systemd/system/dhcpd4.service; enabled; vendor preset: disabled)
   Active: active (running) since Sun 2016-09-25 18:41:57 CEST; 6s ago
  Process: 1552 ExecStart=/usr/bin/dhcpd -4 -q -cf /etc/dhcpd.conf -pf /run/dhcpd4.pid (code=exited, status=0/SUCCESS)
 Main PID: 1553 (dhcpd)
   CGroup: /machine.slice/machine-gw.scope/system.slice/dhcpd4.service
           └─1553 /usr/bin/dhcpd -4 -q -cf /etc/dhcpd.conf -pf /run/dhcpd4.pid

Sep 25 18:41:57 gw systemd[1]: Starting IPv4 DHCP server...
Sep 25 18:41:57 gw dhcpd[1552]: Source compiled to use binary-leases
Sep 25 18:41:57 gw dhcpd[1552]: Wrote 0 deleted host decls to leases file.
Sep 25 18:41:57 gw dhcpd[1552]: Wrote 0 new dynamic host decls to leases file.
Sep 25 18:41:57 gw dhcpd[1552]: Wrote 0 leases to leases file.
Sep 25 18:41:57 gw dhcpd[1553]: Server starting service.
Sep 25 18:41:57 gw systemd[1]: Started IPv4 DHCP server.
$ ss -a -p | grep dhcpd
p_raw  UNCONN     0      0       *:host0                  *                      users:(("dhcpd",pid=1553,fd=5))
u_dgr  UNCONN     0      0       * 7838541               * 7790415               users:(("dhcpd",pid=1553,fd=3))
raw    UNCONN     0      0       *:icmp                  *:*                     users:(("dhcpd",pid=1553,fd=4))
udp    UNCONN     0      0       *:64977                 *:*                     users:(("dhcpd",pid=1553,fd=20))
udp    UNCONN     0      0       *:bootps                *:*                     users:(("dhcpd",pid=1553,fd=7))
udp    UNCONN     0      0      :::57562                :::*                     users:(("dhcpd",pid=1553,fd=21))
netboot
Netboot is a small HTTP service used to handle interactions with the PXE boot script: machine registration and serving kernel files. Once again, very simple setup:
python install.py netboot
systemctl enable --now netboot
systemctl reload nginx
TFTP
The TFTP server is used by the PXE clients to fetch the first stage of the boot
chain: the iPXE binary (more on that in the next section). We simply setup
tftp-hpa:
systemctl enable --now tftpd.socket
The TFTP server will serve files from /srv/tftp. We’ll put files in this
directory in the next step, and then during the setup of the exported NFS
system.
iPXE bootrom
The iPXE bootrom is an integral part of the boot chain for user machines. It is loaded by the machine BIOS via PXE and is responsible for booting the Linux kernel using the nearest RFS. It also handles registering the machine in the MDB if needed.
We need a special version of iPXE supporting the LLDP protocol to speed up machine registration. We have a pre-built version of the PXE image in our Arch Linux repository:
pacman -S ipxe-sadm-git
This package installs the PXE image as /srv/tftp/prologin.kpxe.
udb
Install udb using the install.py recipe:
python install.py udb
Enable the service:
systemctl enable --now udb
systemctl reload nginx
You can then import all contestants information to udb using the
batchimport command:
cd /var/prologin/udb
python manage.py batchimport --file=/root/finalistes.txt
The password sheet data can then be generated with this command, then printed by someone else:
python manage.py pwdsheetdata --type=user > /root/user_pwdsheet_data
Then do the same for organizers:
python manage.py batchimport --logins --type=orga --pwdlen=10 \
    --file=/root/orgas.txt
python manage.py pwdsheetdata --type=orga > /root/orga_pwdsheet_data
Then for roots:
python manage.py batchimport --logins --type=root --pwdlen=10 \
    --file=/root/roots.txt
python manage.py pwdsheetdata --type=root > /root/root_pwdsheet_data
udbsync
usbsync is a server that pushes updates of the user list.
Again, use the install.py recipe:
python install.py udbsync

systemctl enable --now udbsync
systemctl reload nginx
We can then configure udbsync clients:
python install.py udbsync_django udbsync_rootssh
systemctl enable --now udbsync_django@mdb
systemctl enable --now udbsync_django@udb
systemctl enable --now udbsync_rootssh
Note
Adding all the users to the sqlite databases is slow will lock them. You will
have to wait a bit for mdb and udb to sync their user databases.
presencesync
presencesync manages the list of logged users. It authorizes user logins
and maintain the list of logged users using pings from the presenced daemon
running in the NFS exported systems.
Once again:
python install.py presencesync

systemctl enable --now presencesync
systemctl reload nginx
presencesync_sso
This listens to both presencesync and mdb updates and maintains a double
mapping ip addr → machine hostname → logged-in username. This provides a way
of knowing which user is logged on what machine by its IP address. This is used
by nginx SSO to translate request IPs to logged-in username.
We expose an HTTP endpoint on gw nginx at http://sso/. Install the daemon
and nginx config with:
python install.py presencesync_sso

systemctl enable --now presencesync_sso
systemctl reload nginx
All services that support SSO should already have the proper stubs in their
respective nginx config. See the comments in etc/nginx/sso/{handler,protect}
for how to use these stubs in new HTTP endpoints.
Debugging SSO
Typical symptoms of an incorrect SSO setup are:
you’re not automatically logged-in on SSO-enabled websites such as http://udb or http://concours
nginx logs show entries mentioning
__sso_author something about not being able to connect to somessoupstream
Your best chance at debugging this is to check the reply headers in your browser inspection tool.
if there is not any of the headers described below, it means your service is not SSO-enabled, ie. doesn’t contain the stubs mentioned above. Fix that.
X-SSO-Backend-Statusshould beworking, otherwise it means nginx cannot reach the SSO endpoint; in that case check thatpresencesync_ssoworks and http://sso is reachable.X-SSO-Statusshould beauthenticatedandX-SSO-Usershould be filled-in; if the website is not in a logged-in state, it means SSO is working but the website does not understand, or doesn’t correctly handle the SSO headers. Maybe it is configured to get the user from a different header eg.Remote-User? Fix the website.if
X-SSO-Statusismissing header, it means nginx is not sending the real IP address making the request; are you missinginclude sso/handler?if
X-SSO-Statusisunknown IP, it meanspresencesync_ssocouldn’t resolve the machine hostname from its IP; check the IP exists in http://mdb and thatpresencesync_ssois receivingmdbupdates.if
X-SSO-Statusislogged-out machine, it meanspresencesync_ssobelieves no one is logged-in the machine from which you do the requests; check thatpresencesyncknows about the session (eg. using http://map/) and thatpresencesync_ssois receivingpresencesyncupdates.
iptables
Note
If the upstream of gw is on a separate NIC you should replace
etc/iptables.save with etc/iptables_upstream_nic.save
The name of the interface is hardcoded in the iptables configuration, you must edit it to match your setup:
$EDITOR etc/iptables.save
Setup the iptables rules and ipset creation for users allowed internet acces:
python install.py firewall
systemctl enable --now firewall
And the service that updates these rules:
python install.py presencesync_firewall
systemctl enable --now presencesync_firewall
Step 2: file storage
A RHFS, for “root/home file server”, has the following specifications:
It is connected to two switches, handling two separates L2 segments. As such, the machine on a L2 segment is only 1 switch away from it RHFS. This is a good thing as it reduces the network latency, reduces the risk if one the switches in the room fails and simplyfies debugging network issues. It also mean that a RHFS will be physically near the machines it handles, pretty useful for debugging, although you will mostly work using SSH.
Two NICs configured using DHCP, each of them connected to a different switch.
Two disks in RAID1 setup, same as gw.
To bootstrap a rhfs, rhfs01 for example, follow this procedure:
Boot the machine using PXE and register it into
mdbasrhfs01.Go to
mdb/and add aliases for the NIC you just registered:rhfs,rhfs0,hfs0,rfs0. Also add another machine :rhfs1with the MAC address of the second NIC in the rhfs, it shoud have the following aliases:hfs1,rfs1.Reboot the machine and boot an Arch Linux install medium.
Follow the same first setup step as for
gw: see Basic system: file system setup.
Registering the switches
To be able to register the machines easily, we can register all the switches in MDB. By using the LLDP protocol, when registering the machines, they will be able to see which switch they are linked to and automatically guess the matching RHFS server.
On each rhfs, run the following command:
networkctl lldp
You should see an LLDP table like this:
LINK    CHASSIS ID         SYSTEM NAME   CAPS        PORT ID           PORT DESCRIPTION
rhfs0   68:b5:99:9f:45:40  sw-kb-past-2  ..b........ 12                12
rhfs1   c0:91:34:c3:02:00  sw-kb-pas-3   ..b........ 22                22
This means the “rhfs0” interface of rhfs01 is linked to a switch named sw-kb-past-2 with a Chassis ID of 68:b5:99:9f:45:40.
After running this on all the rhfs, you should be able to establish a mapping like this:
rhfs0 -> sw-kb-past-2 (68:b5:99:9f:45:40)
rhfs1 -> sw-kb-pas-3 (c0:91:34:c3:02:00)
rhfs2 -> sw-kb-pas-4 (00:16:b9:c5:25:60)
rhfs3 -> sw-pas-5 (00:16:b9:c5:84:e0)
rhfs4 -> sw-kb-pas-6 (00:14:38:67:f7:e0)
rhfs5 -> sw-kb-pas-7 (00:1b:3f:5b:8c:a0)
You can register all those switches [in MDB](http://mdb/mdb/switch/). Click on
“add switch”, with the name of the switch like sw-kb-past-2, the chassis ID
like 68:b5:99:9f:45:40, and put the number of the interface in the RFS and
HFS field (i.e if it’s on the interface rhfs0, put 0 in both fields).
Step 3: booting the user machines
Note: if you are good at typing on two keyboards at once, or you have a spare root doing nothing, this step can be done in parallel with step 4.
Installing the RHFS
The basic install process is already documented through the ArchLinux Diskless Installation. For conveniance, use:
# Setup the rhfs server, install the exported rootfs
( cd ./install_scripts; ./setup_rfs.sh )
# Setup the exported rootfs
python install.py rfs_nfs_archlinux
Configure the exported rootfs for SADM and network booting. This scripts will
chroot into the exported file system and run the setup_sadm.sh script.
python install.py rfs_nfs_sadm
The installation script will bootstrap a basic Arch Linux system in
/export/nfsroot_staging using the common Arch Linux install script you
already used for bootstraping gw and rhfs. It also adds a prologin hook
that creates tmpfs at /var/{log,tmp,spool/mail}, installs libprologin and
enables some sadm services.
We can now finish the basic RFS setup and export the NFS:
python install.py rfs
# Enable the services we just installed:
for svc in {udbsync_passwd{,_nfsroot},udbsync_rootssh,rpcbind,nfs-server}.service rootssh.path; do
  echo "[-] Enable $svc"
  systemctl enable --now "$svc"
done
Once done, we need to copy the the kernel and initramfs from rhfs to gw,
where they will be fetched by the machines during PXE. We also need to copy
nfsroot_staging to the rfs{0,2,4,6}:/export/nfsroot_ro.
To do so, run on rhfs01:
rfs/commit_staging.sh rhfs01 rhfs23 rhfs45 rhfs67
At this point the machines should boot and drop you to a login shell. We can now start to install a basic graphical session, with nice fonts and graphics:
python install.py rfs_nfs_packages_base
You can reboot a machine and it should display a graphical login manager. You
still need to install the hfs to login as a user.
If you want a full RFS install, with all the code editors you can think of and awesome games, install the extra package list:
python install.py rfs_nfs_packages_extra
To install a new package:
pacman --root /export/nfsroot_staging -Sy package
# deploy the newly created root to rhfs{0,2,4,6}:/export/nfsroot_ro
/root/sadm/rsync_rfs.sh rfs0 rfs2 rfs4 rfs6
Note
Never use arch-chroot or systemd-nspawn on a live NFS export. This will bind the runtime server directories, which will be picked up by the NFS clients resulting in great and glorious system failures.
TODO: How to sync, hook to generate /var…
Start the hfs
On every rhfs machine, install the hfs server:
python install.py hfs
# Change HFS_ID to what you need
systemctl enable --now hfs@HFS_ID
Then, setup the skeleton of a user home:
cp -r STECHEC_BUILD_DIR/home_env /export/skeleton
Test procedure:
Boot a user machine
Log using a test account (create one if needed), a hfs should be created with the skeleton in it.
The desktop launches, the user can edit files and start programs
Close the session
Boot a user machine using an other hfs
Log using the same test account, the hfs should be be migrated.
The same desktop launches with modifications.
Forwarding of authorized_keys
On a rhfs, the service udbsync_rootssh (aka. udbsync_clients.rootssh)
writes the ssh public keys of roots to /root/.ssh/authorized_keys. The unit
rootssh.path watches this file, and on change starts the service
rootssh-copy that updates the authorized_keys in the
/exports/nfsroot_ro.
Step 4: Concours
Setup web
The web services will usually be set up on a separate machine from the gw,
for availability and performance reasons (all services on gw are critical,
so you wouldn’t want to mount a NFS on it for example). This machine is named
web.prolo.
Once again, register a server on mdb and set up a standard Arch system. Add the
following alliases in mdb:
db,concours,wiki,bugs,redmine,docs,home,paste,map,masternode
You will want to ssh at this machine, so enable udbync_rootssh:
python install.py udbsync_rootssh
systemctl enable --now udbsync_rootssh
Then install another nginx instance:
pacman -S nginx
Then, install the nginx configuration from the repository:
python install.py nginxcfg
mv /etc/nginx/nginx.conf{.new,}
systemctl enable --now nginx
Setup PostgreSQL on web
Install and enable PostgreSQL:
python install.py postgresql
systemctl enable --now postgresql
concours
Note
Concours is a contest service. It won’t be enabled by default. See Enable contest services.
Run the following commands:
python install.py concours
systemctl enable --now concours
systemctl enable --now udbsync_django@concours
systemctl reload nginx
You can verify that concours is working by visiting http://concours
Step 5: Setting up masternode and workernode
On masternode (usually, web):
python install.py masternode
systemctl enable --now masternode
workernode must be running on all the users machine, to do that we install
it in the NFS export. The required packages are stechec and
stechec2-makefiles. We will intall them using the prologin Arch
Linux repository:
pacman -S prologin/stechec2 prologin/stechec2-makefiles -r /export/nfsroot_staging
Note
The rfs setup script (setup_nfs_export.sh, ran by install.py
rfs_nfs_sadm) already ran the following commands, we still list them for
reference.
Then, still for the users machines, install workernode:
systemd-nspawn -D /export/nfsroot_staging/
cd sadm
python install.py workernode
systemctl enable workernode
exit # get out of the chroot
You may now reboot a user machine and check that the service is started
(systemctl status workernode.service) and that the worker is registered to
the master.
You should now be able to upload matches to concours/ (you have to enable
it see , see Enable contest services), see them dispatched by
masternode to workernode s and get the result.
Step 6: Switching to contest mode
Contest mode is the set of switches to block internet access to the users and give them access to the contest ressources.
Block internet access
Edit /etc/prologin/presencesync_firewall.yml and remove the user group,
the restart presencesync_firewall.
Enable contest services
By default, most of the web services are hidden from the contestants. In order to show them, you must activate the “contest mode” in some service.
Edit /etc/nginx/nginx.conf, uncomment the following line:
# include services_contest/*.nginx;
Common tasks
Enable Single Sign-On
By default, SSO is disabled as it requires other dependencies to be up and running.
Edit /etc/nginx/nginx.conf, uncomment the following lines:
# lua_package_path '/etc/nginx/sso/?.lua;;';
# init_by_lua_file sso/init.lua;
# access_by_lua_file sso/access.lua;